How to Make a Clew Underquilt
Learn how to make an underquilt with clews for ultimate snuggability.

Synopsis
This article will teach you how to make a new kind of hammock underquilt made with elastic clews. This solves many of the problems that "traditional" underquilts have, such as saggy air pockets, shoulder squeeze, and general fiddlyness. No sewing required. It snaps together!
Clew Underquilts Versus Shock-Cord Loop Underquilts
Traditional Underquilt Designs

The "traditional" underquilt is built by running a shock-cord loop through sewn-in channels down the long edges of the quilt. The short ends usually have a cinch cord. The current trend is to add a "secondary suspension" to prevent the quilt from sliding along the shock cord loop.
I've come to the conclusion that this design is Not Good. Its main weakness is that there is no tug on the middle of the short edge. This leaves it slack down the center, exactly what you don't want. I am constantly fiddling with the connection, the tightness, and the secondary suspension adjustments. I always end up with a large pocket of cold air somewhere on the underside where the quilt doesn't "hug up" correctly. The shock cord loop needs to be so tight that it cuts across my face or neck. I have to do this on every hang. Just when i think i've got it right, i realize at 1am that it isn't snug and i'm getting cold. I'm tired of this routine.
Clew Underquilts

A "clew" is a structure made of many strands of cord attached to the end of a hammock.
A clewed underquilt uses hammock clews made of small-gauge shock cord. It is attached to ribbon loops on the short ends of the quilt. The clew attaches to the main hammock suspension line using a carabiner, S-hook, or simple knot.
Why this works: the lines of the clew evenly distribute "pull" across the short ends of the quilt. Because the clew is made from small-gauge shock cord, it constantly exhibits a light pull to hug the underside of the hammock. When both sides do this, you get a structure that exactly conforms to the shape of your hammock. Every wiggle and squirm you make is reflected in the shape of the quilt. This means that no matter how you lay, the quilt is always, always, always 100% snug up against you for the entire length of the quilt.
Another Big Deal with the clew design is that it has no squeeze or constraint. In my shock-cord designed quilt, i feel like i'm in a shock-cord designed quilt. The natural freedom of being in the hammock by itself is lost, now replaced by the confined feeling of being wrapped in an underquilt with a shock cord across my face. With the clew design, there are no side channels to squeeze or annoy you. It feels just like being in your hammock without an underquilt, except so much warmer!
But wait! There's more! The clew design doesn't need any shock cord sliding adjustments, it fits any hammock design, always works the first time you attach it, and doesn't require any helper mods like "triangle thingies" or "secondary suspensions" to make it work. Plus, it looks cool.
Oh, and its (potentially) lighter, too!

Pros:
- Absolutely no gaps or air pockets. Period.
- Takes the same shape your hammock does, so no squeeze.
- Hangs the same way every time.
- Potentially lighter design.
- Works with any gathered end hammock.
- Easy no-sew retrofit for existing underquilts.
- Easy to attach.
Cons
- No one currently markets this design, so this is strictly DIY.
- About 3 hours of work.
- Works best with full-length quilts. Untested on short quilts, but the nettles may annoy your feet.
- The clew strands can get tangled during transport.
Building It
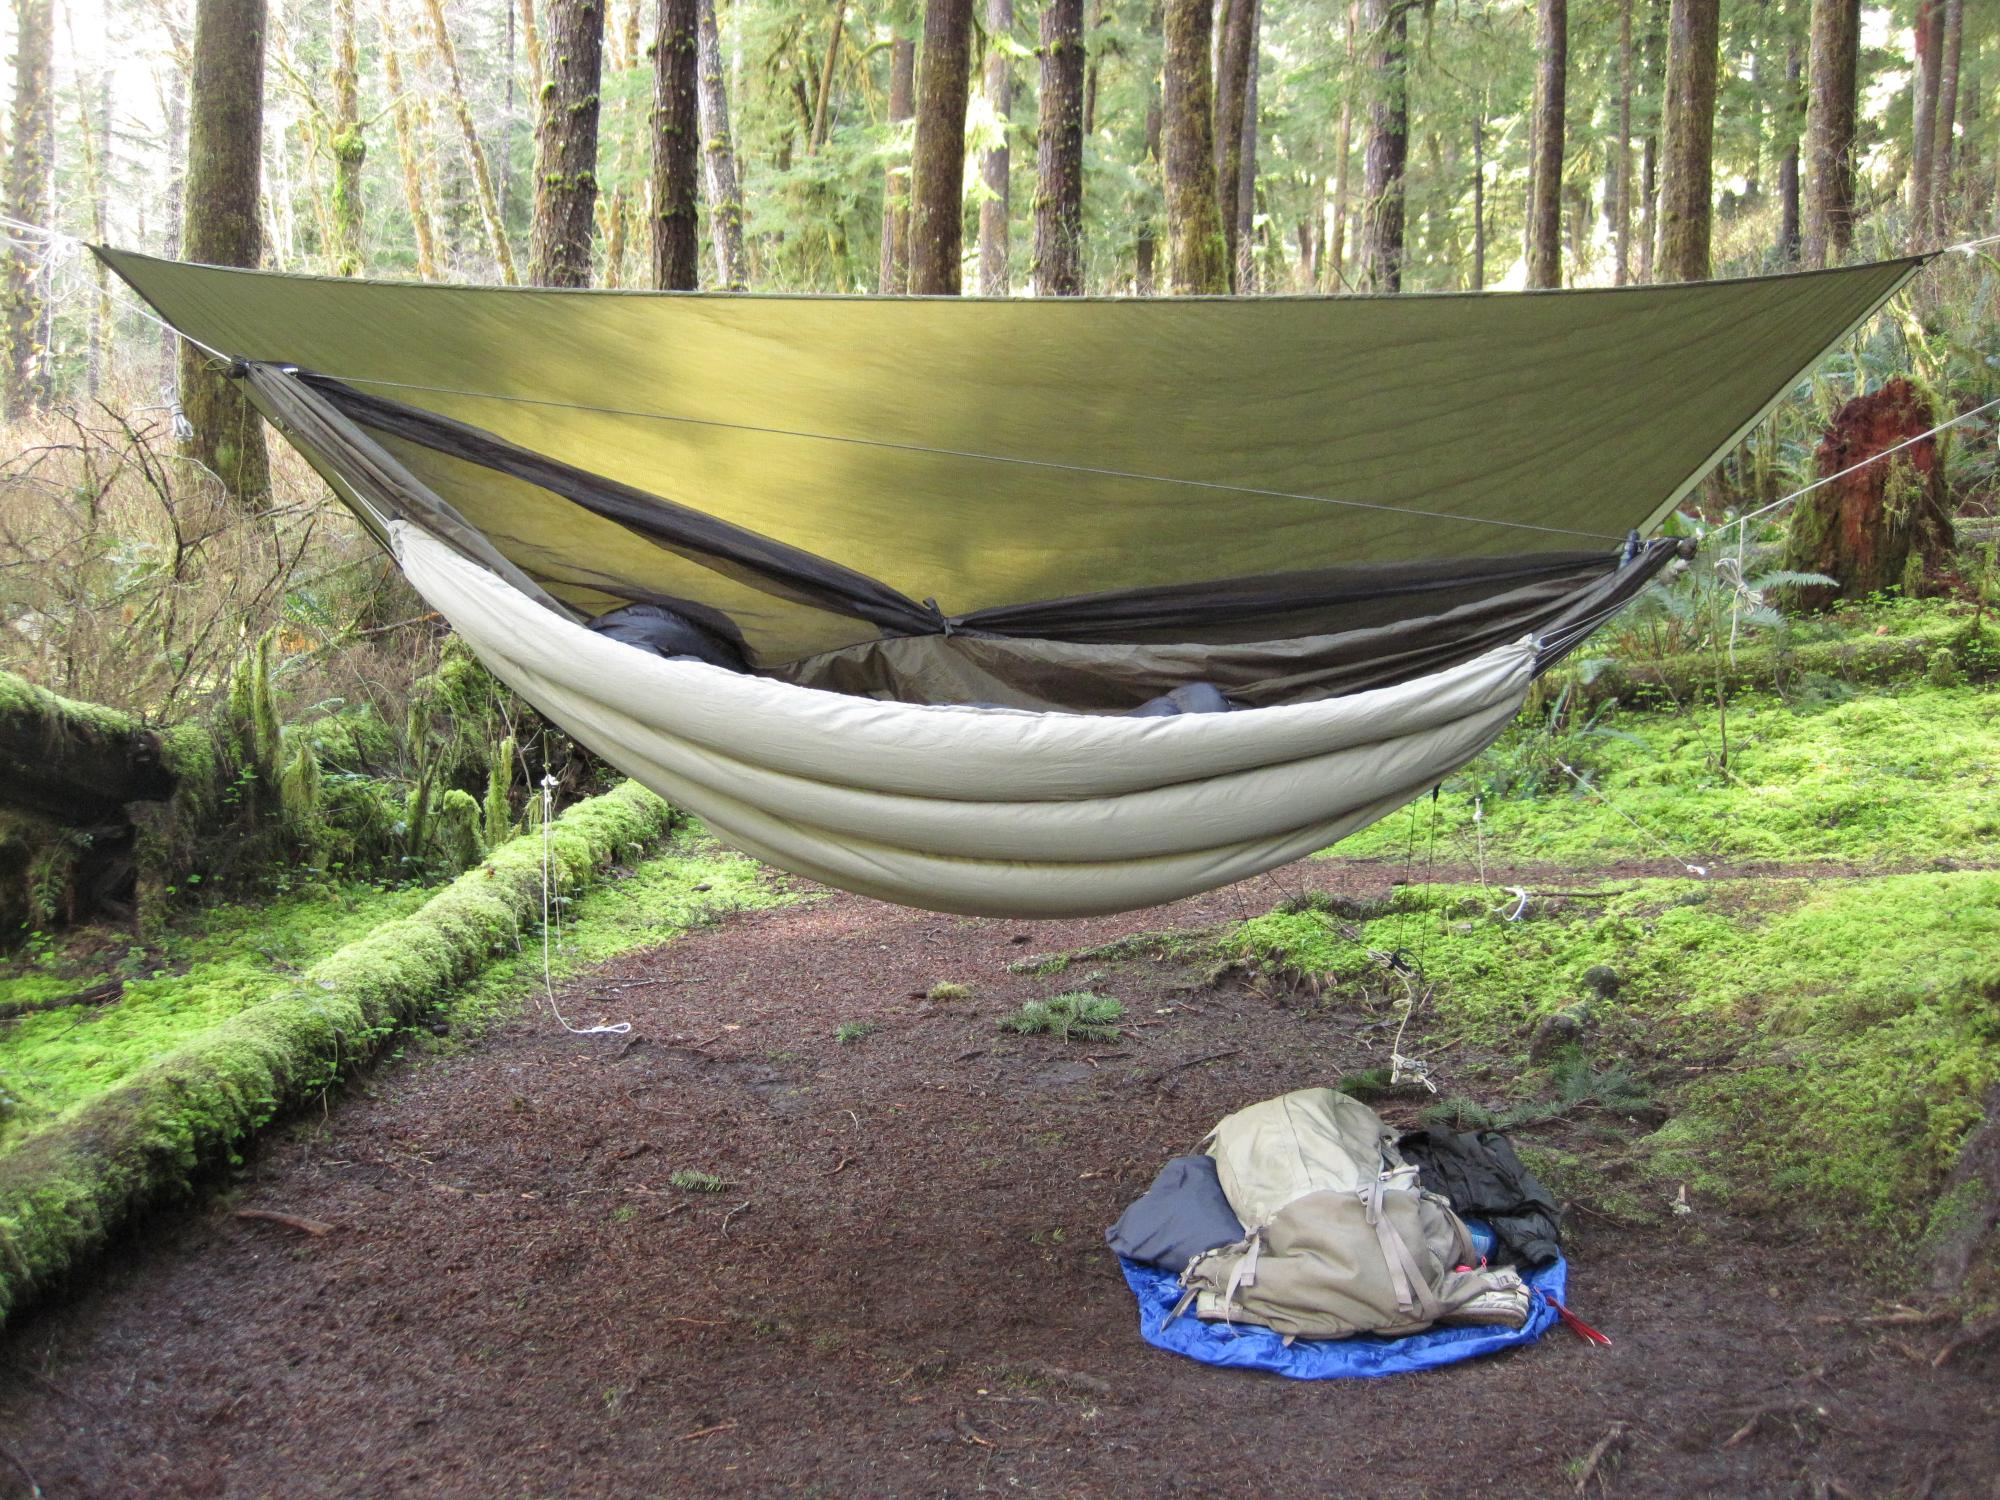
This is what we'll be making:

Step 1: Supplies
You will need the following supplies:
- 2 keyrings, mini-carabiners, or descender rings.
- 100 foot hank of 1/16" shock cord. ($9 on Amazon)
- 3 yards of 1/2" grosgrain ribbon. ($1.50 at fabric store)
- KAM snap pliers kit. ($15 on Amazon)
- 16 KAM snaps. (comes with kit, or <$5 on Amazon if you want specific colors)
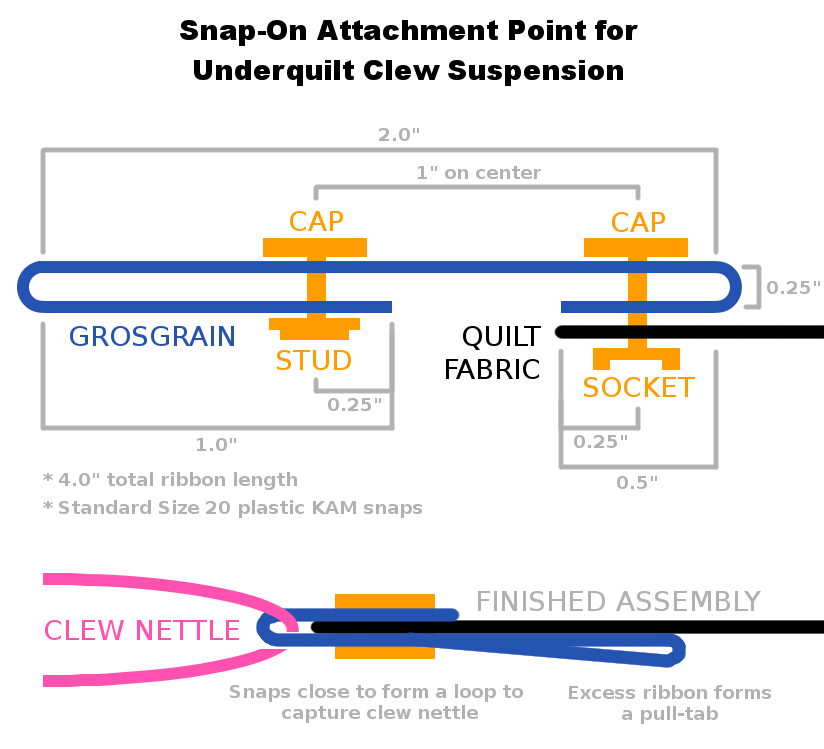
Step 2: Snap-On Attachment Points

The basic idea is to create a loop of ribbon to attach each clew nettle to. We put these together with 4" sections of 1/2" grosgrain ribbon riveted to the edge of the quilt with size 16 KAM snaps.
Before assembling, it is helpful to lightly melt the cut ends of the ribbons with a candle flame to prevent them from fraying.
Pro Tip: If you are retrofitting an existing quilt, you can leave in the drawstring cinch cord. It doesn't hurt, assuming it lets you open the quilt out to its full, natural width.
Snap on at least 8 attachment loops along each short edge of the quilt. My frankenquilt has 7 lengthwise baffles, so i placed the loops at the top of the baffle seams to handle the stress better; Six on the seams, one on each corner.


Step 3: Make Clews
About the materials:
- 1/16" shock cord. You need at least 40 feet for two clews on a full length quilt, so get a 100ft hank to make sure everything is covered and you have room for mistakes. It's very important that you get 1/16" (small gauge) cord. 1/8" is overkill and will make the quilt super-tight. Remember that you will have 2 edges x 8 nettles x 2 strands per nettle. The combined force of 32 strands is plenty of tug for this project. This is also your chance to add some flair, so pick nice colors!
- Two rings. I recommend using a mini keychain carabiner or common key ring. It doesn't need to be strong. SMC Descender rings or welded rings from the hardware store also work, but tend to be heavy. You might even be able to use a simple fixed loop/shackle.


Making clews is easy. You need a board and two nails. Put the nails in the board spaced apart however long you want your clews to be. Put your keyring or mini-carabiner on one nail.
Tie one end of the shock cord to the ring with a simple slip knot, leaving at least an 8" tail. Go around the second nail with the cord and back through the ring. Do this once for each nettle you need (mine has 8). Use light, even tension.
After the cord takes the final trip through the ring, make a temporary whipping to hold it together. Leave another 8" tail and cut the shock cord.
Make two of these.
Later, after you have tested the completed assembly, you can remove the temporary whipping and whip the two tail ends of the shock cord into a Western Country Whipping. This means just tying overhand knots with the loose ends back-front-back-front-back-front. This is much easier, faster, and more secure.
Tip: Several users have found that the quilt shapes better if you leave the first and last nettles about 2 inches shorter than the others. This puts more tension across the edges of the quilt.
How long should the nettles be? Your finished quilt, including clews, should be about 85% of the length of the hammock itself (as measured around the bottom). This gives the best contour.
nettle_length = ( hammock_length - quilt_length ) * 0.425
Pro tip: You can always put your finished quilt on a larger hammock but not a smaller one. Thus, err on the small side.
Note: If you are making clews for a short-length quilt, you will probably end up with one long and one short clew. You'll just need to measure them yourself. (You can position the quilt better with attachment cord later, if needed).

Historical Note: The original protoype used a Shouldered Sword Mat weave for the clew, inspired by Derek Hansen's WW2 Navy Hammock tutorial. You can still use this if you feel like being fancy, but the whipping method is MUCH easier.
When you're done, you should have two clews woven onto rings, each with 8 loose nettles.
Step 4: Attachment
Here's the easy part. Just snap each clew nettle onto an attachment point and hang that baby up!
If you measured your quilt to match a specific hammock, you can probably just use a keychain carabiner to hook it directly to the hammock suspension.
If you need adjustability, tie a short length of regular cord onto the ring and attach it to the hammock suspension using a simple slip-knot.
Finished Product:


Notice the graceful bow in the quilt's shape when it is attached. That's because it has no shock cord around the edge trying to pull it upward. It also means that it is more comfortable to be in.
Background
I keep a large Brazilian hammock hung in my spare room (the "hammock room"). I thought of this design one day when i was testing some new rigging for my Warbonnet hammock. It was cold in the room that day, so i wondered what would happen if i hung the Warbonnet inside the Brazilian, both from the same hooks. I stacked a blanket in between for warmth. It worked. It worked really well. "Underquilts should work like this, too", i thought. Thus, the "hammock inside a hammock" idea was born. It handily solves the air-pocket problems of regular underquilt designs.
Next, i found Derek Hansen's wonderful WWII Navy Hammock and Clew Tutorial. I wondered if this could be adapted for underquilt use.
I spent a day retrofitting my existing DIY frankenquilt with clews. It hung wonderfully the first time.
The first draft of this article suggested sewing on shirt buttons. After a few design iterations, the newer snap-on method was adopted. Buttons are no longer recommended.
Further Exploration
Nettle Configuration

I made my quilt with 8 same-sized nettles. This produces a good result with just a little bit of side-pressure.
However, with a different jig you can vary the nettles which produces different results:
- Concave (exterior nettles longer than interior) - Creates loose edges and a tight fitting bottom.
- Symmetric (all nettles same length) - Creates relaxed edges and good fitting bottom. Also easier to make because you only need one hook.
- Convex (exterior nettles shorter than interior) - Creates more tension on the long sides, producing more squeeze and wrap.
- Asymmetric (one side longer than the other) - Two opposing asymmetric clews will create a skew in the quilt. If you tend to lay in only one direction or have a one-sided hammock, this is an interesting option.
Alternative Attachments
Instead of snap-loops, you might consider these alternatives:
- Linelocs - Sew on a plastic lineloc with a bit of grosgrain ribbon, then attach a single line of cord. For this method, each cord is tied to the end ring and adjusted individually. No weaving required.
- Grommets / Eyelets / Punch Holes - You can get a grommet setter at a craft store and punch them in. Use a length of stiff cord to thread through each nettle (similar to the Navy Hammock method).
Socks
One downside to this design is that clew nettles can get tangled. To help with this, you might design some kind of tight-fitting sock or skirt to wrap the nettles while in transport, similar to a tarp snake skin.
Fitting
You can add a length of regular cord to the ring on the clew and use this to attach to the hammock. Use this method if you need to attach your finished quilt to a larger hammock, or to adjust the positioning of the quilt underneath you. If I'm not out camping, I use this method to attach the quilt to my indoor Brazilian hammock, which is much longer than my Warbonnet.
More Information
Here is the original hammockforums thread on the clew design.
You can also check out early adopter Jellyfish's videos on making a clew quilt suspension from scratch.
FAQs
What do we call this thing?
People are calling it either a "clew underquilt" or an underquilt with "clew suspension".
Is it okay if i copy this design?
Of course. Knock yourself out.
Is it okay to use this design for commercial purposes?
Yes. May your employment be gainful. Maybe send me a prototype or something.
Thanks for reading. Happy hammocking!